Go to Google Images, and find a picture that would well match your background of your blog. Save it to your desktop.
Now, open up Paint. Open up your saved background, and select "Resize". Select "Pixels", and then uncheck "Maintain Aspect Ratio". You're going to need more horizontal pixels than vertical pixels, but re-size however you think it would work with your blog.
Add your title, and then add any other things that you'd like. Save your project. DON'T EXIT PAINT YET, IN CASE THE PIXEL AMOUNT ISN'T ENOUGH!
Now, go back to Blogger. Click on "Layout".
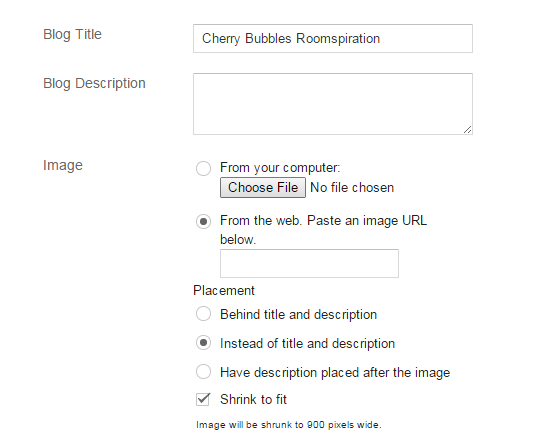
Find your blog's title on "Layout", and click "Edit".
Check "Shrink To Fit", and "Instead of Title and Description", and upload your image.
If it looks a little bit too small, go back to Paint, resize, save, and upload, until you get the desired result.


OMG THANKS SO MUCH FOR DOING THIS I HAVE BEEN DYING TO DO IT UR SO AMAZING I LOVE YOU!!!!!!!!!!!!!!!!!!!!!!!!!!!!!!!!!!!!!!!!!!!!!!!!!!!!!!!!!!!!!!!!!!!!!!!!!!!!!!!!!!!!!!!!!!!!!!!!!!!!!!!!!!!!!!!!!!!!!!!!!!!!!!!!!!!!!!!!!!!!!!!!!!!!!!!!!!!!!!!!!!!!!!!!!!!!!!!!!!!!!!!!!!!!!!!!!!!!!!!!!!!!!!!!!!!!!!!!!!!!!!!!!!!!!!!!!!!!!!!!!!!!!!!!!!!!!!!!!!!!!!!!!!!!!!!!!!!!!!!!!!!!!!!!!!!!!!!!!!!!!!!!!!!!!!!!!!!!!!!!!!!!!!!!!!!!!!!!!!!!!!!!!!!!!!!!!!!!!!!!!!!!!!!!!!!!!!!!!!!!!!!!!!!!!!!!!!!!!!!!!!!!!!!!!!!!!!!!!!!!!!!!!!!!!!!!!!!!!!!!!!!!!!!!!!!!!!!!!!!!!!!!!!!!!!!!!!!!!!!!!!!!!!!
ReplyDeleteOf course!
Delete